Part 3
Designing the Application
In which we'll start designing our first application,
look at how to handle pictures, and discover how to manipulate
windows and graphics.
Fail to Plan, Plan to Fail
It's an old adage, but it holds true in program design more
than anywhere.
One of the aims of this tutorial series is to show you how
to create your own OPL application that you can distribute
yourself. To do this, we're going to design a game from scratch,
and using the Event Core, build it up into a full application
before your very eyes.
We're going to build a logic game called Master. Based
on the board game Mastermind, there is a 4 colour code that
you need to guess. When you make a guess, you are told how
many colours are right in the right place, how many are in
the wrong place (but are in the final code) and how many are
colours are not in the final code. You get 10 guess and if
you don't work out the code, then you loose!
Just to reiterate, there is no right or wrong way to go about
designing and coding an application. This way is the way that
I have found to be best for me. If you want to change anything,
or do things in a different order, then feel free.
How to Play Master
What you need to do now is break down the application into
smaller sections - each section will consist of a few procedures,
and individual steps in these sections will probably be the
individual Procedures.
If we go back to our story metaphor, you're breaking the
application down into chapters and paragraphs so that the
translation into OPL code is easier then if you tried to write
it straight down onto a blank sheet of paper.
User Interface
Put simply, what does it look like? Take a few seconds to
sketch some ideas out on some paper. Don't worry that you
don't know how to work the graphics yet, what you want is
a flavour of your aim. We can improve it later.
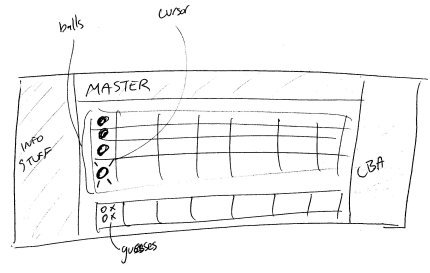
Master's initial UI sketch
One other thing you need to decide is what information bars
will be permanently on screen. You can choose from the CBA
side buttons (on the right), the Title bar (along the top),
and the Status bar (on the left). For Master, we'll show all
three, and these will be specified in the initial .ini file
settings in the code (PROC LoadINIFile:)
Note that many applications allow you to change the toolbars
being on or off from within the program. We will look at this
at a later date, but for the moment, let's leave them fixed.
Once you've worked on a few of your own applications, it will
become a lot clearer.
Background Wallpaper
One thing that will make Master stand out is the program
will not be played out on a white screen, but will have a
background 'desktop' style image. Not only will this teach
you different graphics techniques, but it also adds to the
appeal of the application.
Never underestimate the power of something simple to improve
an application in the eyes of the user. In the game Quad,
at the last minute I added a small routine that showed (over
4 windows that displayed a simple graphics and a few lines
of text) the basic principles of the game. It was only shown
the first time the game was opened (although it could be called
from the menu at any point). While all this information was
in the help file (as it should be) almost every review highlighted
this tutorial as an amazingly helpful feature. For the small
amount of effort, the rewards to the user and the programmer
were immense. Take note.
Controls
The user will have five controls, the cursor keys and space
to select a colour. On the game grid, up and down will move
an on-screen cursor up and down, selecting where to place
a colour. Using left and right will cycle through the colours.
Pressing space will make a guess with the listed colours.
As well as this, the menu will the basic menu entries that
the Event Core has. In addition to this, it will also have
options to select the difficulty level of the the game
Difficulty Levels
The easiest way to increase the difficulty of the game is
to increase the number of coloured balls. So the easy skill
level will have 4 colour, the medium will have 6, and difficult
will have 8.
Using Graphics in OPL
It's been a long time since computers only had text characters
to display on the screen. Now you can create and manipulate
small pictures to create a much clearer display for the user.
It has also made computers easier to use (although Command
Line Interfaces like DOS and the Linux Console still have
their place).
Anyway, you have two basic graphical elements in OPL. When
you initialise them, each item is given a reference number
by the computer. Rather than remember these arcane numbers
(and they can change each time a program is run), you can
hold them in an array. In the Event Core, the array id%()
is used, so you can use id%(1), up to whatever the maximum
number you defined in the GLOBAL id%(x). 16 is probably more
than enough.
Windows
A window is where you will place your graphics. Consider it
the sheet of paper you're going to work with. One of the great
things about windows is you can have more than one of them,
so if your screen is split into two views then you could have
this made up by a window on the left, and a window on the
right.
You must create a window before using it. When you create
it, the window number is RETURNED from the command, and it
is this number you store in the id%() array...
id%(1)=gCREATE 0,0,640,200,K_Const_256Colours,1
How it works. The first pair of numbers (0,0 in the example)
represent the top left corner of the window. In the case of
(0,0) this means the window starts at the very top left of
the Communicator screen. These co-ordinates are in (x,y) format,
so (320,20) is halfway across the screen, 20 pixels from the
top of the screen.
The next pair of numbers (640,200) represent the width of
the window (here 640 pixels) and the height of the window
(200 pixels).
The second last number isn't a number at all! Here it's part
of the default Constants. This number decides how many individual
colours a window can show. While the Communicator can support
up to 4096 colours, for all practical purposes 256 colours
will be more than enough. There may even be circumstances
where you want to allow less colour in a window, dropping
to 16 colours, or even black and white monochrome if it is
a text only window. The main reason for this is that the less
colours required in a window, the less memory it takes up.
Bitmaps
Your bitmap is the graphic that you make up in a graphics
package and include with your application. You can have lots
of little pictures, or one big one and copy over only the
part you need onto the paper (the window). The first thing
you need to do is load the bitmap into the memory of the machine.
Just because it has been copied onto the disk, that doesn't
mean the program can see it.
id%(9)=gLOADBIT("D:\System\Apps\Master\Master.mbm",0,3)
This will load the bitmap from the file master.mbm in the
directory D:\System\Apps\Master\ . The two numbers at the
end are very important, and will change depending on the file.
The second number (3), tells the computer what bitmap to
use from the MBM file. MBM files can hold Multiple Bitmaps
(hence .mbm). The first bitmap is bitmap 0, the second is
bitmap 1, and so on.
The first number determines if you can alter or edit the
bitmap within the program. Unless you are doing an art package,
or need to manipulate the mbm for some reason, you would leaves
this as read only, which is 0. (to be able to edit,
put a 1 here).
Closing Graphical Elements
Whenever you finish with a graphical Window or Bitmap, you
should close it. This makes sure that memory is reclaimed
by the computer, and your application is more effective. This
is done simply by
gCLOSE id%(foo%)
Where foo% is the array index number. A good idea at the
end of every application (in PROC exit:) is to double check
all the elements are closed.
foo%=0
DO
   foo%=foo%+1
   TRAP gCLOSE id%(foo%)
UNTIL foo%=16
REM *** Where 16 is the number of elements defined in the id%() array.
TRAP will, of course, make sure an error is not raised if
the graphical element isn't opened.
Copying MBM's To Windows
Let's break down the command that allows you to copy bitmaps
to windows.
gUSE id%(1)
gCOPY id%(9),100,0,40,50,3
The first command (gUSE) tells the computer what graphical
window is to be made the current window. When you gCREATE
a new window, it is automatically made the current (or active)
window, but it is always best to use the gUSE command before
any graphical operation.
Now the gCOPY command. The first number, id%(9) tells the
computer which bitmap is to be copied from, into the current
window. You now specify an area of that bitmap to copy. The
next two numbers (100,0) say where the top left corner is
(in pixels), measured from the top left corner of the bitmap.
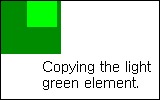 The
next two numbers (40,50) specify the width and the height
of the portion of the bitmap which is to be copied. The
next two numbers (40,50) specify the width and the height
of the portion of the bitmap which is to be copied.
The image to the left shows an example of the gCOPY process
described above.
The final number determines how the bitmap is to be copied.
Here's the different ways you can copy images. The checkerbboard
is being gCOPY'ed in these examples onto the straight lines,
and only the final number is changed to show you what you
can do.
|
Mode 0 (Set)
|
Mode 1 (Clear)
|
Mode 2 (Invert)
|
Mode 3 (Replace)
|
|
|
|
|
|
Time To Rest
It may seem like that for the last three lessons, you've been
reading and there is very little practical examples of what
I promised. Well, in the next lesson, we're going to construct
the mbm file for Master, and start the coding in earnest!
Got any questions or comments arising from this tutorial.
Need help with OPL. Head to the forums
for help from the friendly community.
|